Friday, November 4, 2016
Hoorag.com is sending me a sample!
A lady from Hoorag.com is sending me a Dark Digital Hoorag to review! Pretty stoked! Stay Tuned!
Tuesday, September 20, 2016
LOLA Advanced Assessment Stethoscope
As an EMT, one generally carries a variety of small tools for completing patient assessments, including but not limited to a stethoscope, pen light with pupil gauge, pen, clipboard with pertinent paperwork, trauma shears, oxygen wrench and a radio or phone. Seeing as how keeping one’s gear together and out of the way can be a little troublesome while moving about, taking vitals and performing other tasks such as taping patients to backboards, it goes without saying that a streamlined multi-purpose patient assessment tool would be of great use to an EMT or like-minded healthcare professional. It is this desire that the LOLA Advanced Assessment Stethoscope can fulfill.
The LOLA Advanced Assessment stethoscope is an innovative tool that combines several critical patient assessment tools into one package, namely the stethoscope, penlight, pupil gauge and ruler. Separately, these tools are generally of low quality and difficult to effectively manage. Combined into the LOLA stethoscope, one has an efficient and well-designed tool that will last a great long while.
I’ve had the opportunity to assess the quality and effectiveness of the LOLA stethoscope for a few months now on a wide variety of patients and in different situations and have been overall impressed with everything about it. To better describe this stethoscope, I will break this review down into features I find important.
1) Packaging: This stethoscope comes packaged in an attractive box that is easy to open and remove the contents from. In the box is a stethoscope with clear earbuds and a small pack containing three other pairs of earbuds and an extra battery for the light. Each pair of earbuds is unique and can be customized to fit the end user.

2) Stethoscope head: The stethoscope head is comprised of stainless steel and the tympanum is a clear plastic. The rim of the tympanum does not have a non-chill ring. The plastic is quite rugged as well.
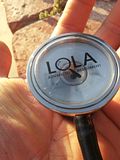

3) Light switch: Atop the head is a push-button to activate the light. The button is a constant-on switch and light is emitted from a single LED. The button itself is rubbery and easy to activate.
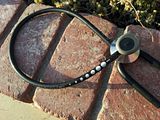
4) Tube: There is just one tube for this stethoscope and it is made of a non-latex material that is rigid yet flexible. On the tube is a pupil gauge with examples of pupil sizes from 1mm-8mm. There is also a 40cm ruler printed on the tube, complete with millimeter markings.
5) Ear portions: The ear portions of the stethoscope are stainless steel and end in threads to accept a proprietary metal threaded mounting bud whereupon one can fix one of four different pairs of earbuds to make a custom fit for the user.
6) Fit: The multiple ear buds were quite useful for me in acquiring a good fit and I achieved a good level of comfort. They came in handy on two different occasions:
a. I will often watch a show on my phone while waiting for patients but I don’t want to disturb my partner and I don’t have earphones so I just use my stethoscope and keep the volume low on my phone. Works like a charm and I can stay comfortable for over 30min at a time. I couldn’t do that without some decent fitting ear buds.
b. My friend and I were sparring with rubber training knives one night and having a good time. That is, until he got a little too frisky and ended up sticking the tip of one in my right ear and leaving me with a good 3/16” cut in the inner cartilage (nothing serious, just painful at the time and funny now, seeing as how I used a tampon to help stop the interestingly profuse bleeding). In any case, I had to change out my ear buds so I could actually work without dreading the pain from using my stethoscope. Without my extra buds, I would have been in much more pain than I would have liked.

See the cut inside my ear? Yeah, that one hurt pretty bad.
7) Acoustic quality: I have compared this stethoscope’s acoustic qualities with a Littman Master Classic II, Littman Classic II SE, Littman Cardiology III and my mother’s no- name stethoscope from when she was a nurse back in the 1960s (I was a bit of a stethoscope junkie a while ago, sort of by accident) while in an ideal setting (sitting in my room, door closed, none of my sisters fighting, etc) and I found the acoustics to be equal to or better than that of the Classic II SE, Master Classic II and the no-name stethoscope, beaten only by the Cardiology III. My pulse under pressure from a sphygmanometer sounded like a hammer striking wood and my heart sounded loud as well, though not as loud as with the Cardiology III. Unfortunately, I haven’t been trained to pick up heart sounds past the normal atrioventricular and semilunar valve closures (“lub” and “dub”, respectively) so I can’t really comment on aberrant cardiac issues like clicks, rubs or murmurs. Listening to lung sounds were not a problem either.
In actual use, of course, situations are not ideal and are quite noisy. However, while performing my duties as the attendant, I never had a problem acquiring blood pressure readings and lung sounds, even with edemic patients.

8) Light quality: The light is a diffuse “cool” white color and is bright enough for finding objects about 3’ away if needed. Seeing the pupil diameter of a patient’s eye requires a closer distance though (especially in the dark) and from my use I it seems about 6-12” is the maximum distance for checking pupils diameters.
9) Pupil gauge and ruler: The pupil gauge and ruler are both painted onto the tube and are quite clear with sharp demarcations.
10) Neck hangability: This stethoscope hangs nicely around the neck and the tube material does a good job gripping cloth
11) Length of the tube: The tube length is a good 21”, which is much nicer for ease of patient care and for patient comfort than my 15” Littman Cardiology III, especially for those times when I am bouncing around in the back of an ambulance and I can’t get a blood pressure on the left arm and must reach over and use the right arm from a right-sided only ambulance. Yeah, you know what I mean.
As with all products, there are a few things that I would like to either see improved upon or tweaked by the end user to make the product easier to manage, namely:
1) I would love to see a non-chill ring on the tympanum’s rim. Sure, it isn’t necessary but it is a nice feature for better patient comfort.
2) The metal ear bud fixtures could use a little blue (NOT RED) Loctite to stay on the stethoscope without falling off. One of mine came unscrewed while I was on the job so I hijacked the earbuds off of my old Sprague and jammed them on there so I can use them while I get around to ordering new ear bud fixtures.
Bottom line: This is a very good stethoscope for the money and I highly recommend it, especially for EMTs, CNAs and the like. There are certainly many worse and useless ways to spend your money, like buying a cheap double lumen Sprague or US government bonds, whereas this stethoscope should be with you for years to come.
CARRY ON!
-N8
The LOLA Advanced Assessment stethoscope is an innovative tool that combines several critical patient assessment tools into one package, namely the stethoscope, penlight, pupil gauge and ruler. Separately, these tools are generally of low quality and difficult to effectively manage. Combined into the LOLA stethoscope, one has an efficient and well-designed tool that will last a great long while.
I’ve had the opportunity to assess the quality and effectiveness of the LOLA stethoscope for a few months now on a wide variety of patients and in different situations and have been overall impressed with everything about it. To better describe this stethoscope, I will break this review down into features I find important.
1) Packaging: This stethoscope comes packaged in an attractive box that is easy to open and remove the contents from. In the box is a stethoscope with clear earbuds and a small pack containing three other pairs of earbuds and an extra battery for the light. Each pair of earbuds is unique and can be customized to fit the end user.

2) Stethoscope head: The stethoscope head is comprised of stainless steel and the tympanum is a clear plastic. The rim of the tympanum does not have a non-chill ring. The plastic is quite rugged as well.


3) Light switch: Atop the head is a push-button to activate the light. The button is a constant-on switch and light is emitted from a single LED. The button itself is rubbery and easy to activate.
4) Tube: There is just one tube for this stethoscope and it is made of a non-latex material that is rigid yet flexible. On the tube is a pupil gauge with examples of pupil sizes from 1mm-8mm. There is also a 40cm ruler printed on the tube, complete with millimeter markings.

5) Ear portions: The ear portions of the stethoscope are stainless steel and end in threads to accept a proprietary metal threaded mounting bud whereupon one can fix one of four different pairs of earbuds to make a custom fit for the user.
6) Fit: The multiple ear buds were quite useful for me in acquiring a good fit and I achieved a good level of comfort. They came in handy on two different occasions:
a. I will often watch a show on my phone while waiting for patients but I don’t want to disturb my partner and I don’t have earphones so I just use my stethoscope and keep the volume low on my phone. Works like a charm and I can stay comfortable for over 30min at a time. I couldn’t do that without some decent fitting ear buds.
b. My friend and I were sparring with rubber training knives one night and having a good time. That is, until he got a little too frisky and ended up sticking the tip of one in my right ear and leaving me with a good 3/16” cut in the inner cartilage (nothing serious, just painful at the time and funny now, seeing as how I used a tampon to help stop the interestingly profuse bleeding). In any case, I had to change out my ear buds so I could actually work without dreading the pain from using my stethoscope. Without my extra buds, I would have been in much more pain than I would have liked.

See the cut inside my ear? Yeah, that one hurt pretty bad.
7) Acoustic quality: I have compared this stethoscope’s acoustic qualities with a Littman Master Classic II, Littman Classic II SE, Littman Cardiology III and my mother’s no- name stethoscope from when she was a nurse back in the 1960s (I was a bit of a stethoscope junkie a while ago, sort of by accident) while in an ideal setting (sitting in my room, door closed, none of my sisters fighting, etc) and I found the acoustics to be equal to or better than that of the Classic II SE, Master Classic II and the no-name stethoscope, beaten only by the Cardiology III. My pulse under pressure from a sphygmanometer sounded like a hammer striking wood and my heart sounded loud as well, though not as loud as with the Cardiology III. Unfortunately, I haven’t been trained to pick up heart sounds past the normal atrioventricular and semilunar valve closures (“lub” and “dub”, respectively) so I can’t really comment on aberrant cardiac issues like clicks, rubs or murmurs. Listening to lung sounds were not a problem either.
In actual use, of course, situations are not ideal and are quite noisy. However, while performing my duties as the attendant, I never had a problem acquiring blood pressure readings and lung sounds, even with edemic patients.

8) Light quality: The light is a diffuse “cool” white color and is bright enough for finding objects about 3’ away if needed. Seeing the pupil diameter of a patient’s eye requires a closer distance though (especially in the dark) and from my use I it seems about 6-12” is the maximum distance for checking pupils diameters.
9) Pupil gauge and ruler: The pupil gauge and ruler are both painted onto the tube and are quite clear with sharp demarcations.
10) Neck hangability: This stethoscope hangs nicely around the neck and the tube material does a good job gripping cloth
11) Length of the tube: The tube length is a good 21”, which is much nicer for ease of patient care and for patient comfort than my 15” Littman Cardiology III, especially for those times when I am bouncing around in the back of an ambulance and I can’t get a blood pressure on the left arm and must reach over and use the right arm from a right-sided only ambulance. Yeah, you know what I mean.
As with all products, there are a few things that I would like to either see improved upon or tweaked by the end user to make the product easier to manage, namely:
1) I would love to see a non-chill ring on the tympanum’s rim. Sure, it isn’t necessary but it is a nice feature for better patient comfort.
2) The metal ear bud fixtures could use a little blue (NOT RED) Loctite to stay on the stethoscope without falling off. One of mine came unscrewed while I was on the job so I hijacked the earbuds off of my old Sprague and jammed them on there so I can use them while I get around to ordering new ear bud fixtures.
Bottom line: This is a very good stethoscope for the money and I highly recommend it, especially for EMTs, CNAs and the like. There are certainly many worse and useless ways to spend your money, like buying a cheap double lumen Sprague or US government bonds, whereas this stethoscope should be with you for years to come.
CARRY ON!
-N8
Wednesday, August 31, 2016
Remington .40S&W UMC Target Ammo
So a nice lady named Heidi at Luckygunner.com sent me a brand spanking new box of Remington UMC .40S&W target ammunition for me to put through the FN FNP-40 pistol (will do a review on that bad boy after some more exposure time!). It took me a while to get to the range to test out this ammunition due to my various jobs (on-call EMT and party bus driver), my last finals (YES! I am edumacated now!) and various family obligations so I appreciate Heidi's patience and trust in this matter.
After testing out my Remington Model 12 on paper and putting a few rounds through the Tokarev TT-33, I chilled out enough to shoot the FNP-40. I first started with testing out my reloads at 7yd and 15yd intervals. Reloads tested were 155gr SWC lead cast bullets over 3gr of Titegroup.
These loads were not tested beforehand and were just loaded up as
generic plinker loads. Here are the results of the first round. I did general testing on the first target (read: did some miscounting) with the following regimen:
Center: 2 test shots at 7 yards to determine POA/POI
Upper left: 1st shot DA, 3 shots SA, 7yds
Upper right: 1st shot DA, 5 shots SA, 7yds
Lower left: 1st shot DA, 5 shots SA, 15yds
Lower right: 1st shot DA, 5 shots SA, 15yds
Group sizes for target #1
Upper left: 2.1" (1.1" without the outlier)
Upper right: 2.1" (1.1" without the two outliers)
Lower left: 5.1" ( 2.1" without the gigantic outlier to the top right of the circle)
Lower right: 3.85" (no real compensation that can be granted with this one)

Target #1. Personal reloads.
The second round of shooting consisted of the Remington UMC ammunition. Course of fire was as follows:
Upper left: 1st shot DA, 5 shots SA, 7yds
Upper right: 1st shot DA, 5 shots SA, 7yds
Lower left: 1st shot DA, 5 shots SA, 15yds
Lower right: 1st shot DA, 5 shots SA, 15yds
Group sizes for this target #2 are as follows:
Upper left: 1.85" (no compensation)
Upper right: 2.6" (1.35" without the two outliers)
Lower left: To preserve my dignity, I am not going to even bother with this one.
Lower right: Dignity preservation enacted here as well. 3 bullet holes are missing.

Target #2. Remington UMC Target
After my earth-shattering performance in round two, I gave it another go in round three.
Course of fire was as follows:
Upper left: 1st shot DA, 5 shots SA, 7yds
Upper right: 1st shot DA, 5 shots SA, 7yds
Lower left: 1st shot DA, 4 shots SA, 15yds
Lower right: 1st shot DA, 3 shots SA, 15yds
Group sizes for target #3 are as follows:
Upper left: 3.225" (2.475" without the outlier)
Upper right: 2.1" (no compensation for this group)
Lower left: 1.85" ( 1.35" without the gigantic outlier to the top right of the circle)
Lower right: 1.35" (no real compensation that can be granted with this one)

Target #3. Remington UMC Target, second round.
Recoil for the Remington UMC Target ammo was moderately stout and feed and extraction in my pistol was flawless. The bullets punched cleanly through the paper, as any good target ammunition should do.
Looking at the targets and group sizes, it goes without saying that I am in need of some more practice, though at the end I was able to focus a little better and squeeze out some pretty nice groups. An exacerbating factor that may have affected my shooting ability is that I was running a very fast heart rate and high blood pressure due to an idiopathic reaction to medication I have been taking for years. The day after I shot these groups I actually had to go to the ER to get assessed and scanned. I am fine now and will be getting on some different medications here pretty soon (in case you were wondering). As some of you may know, he isnt stoked with
In addition, I have noticed that the FNP-40 seems to shoot low.
Like, really low. I don't quite know why that is but it is something I
would like to correct.I had to compensate for the drop by aiming at the 12:00 position about 3-4" high. Some of the outliers you see are from when I failed to do so.
Overall, this is a consistently loaded ammunition with good target characteristics and firm yet gentle handling characteristics. Results may vary amongst guns but I think at least the average shooter (since I am an average, if not regrettably a subpar average shooter) will find good results with this ammo.
Until next time, CARRY ON!
Sunday, August 28, 2016
First Light USA Tomahawk LE
By David De La Torre
When I first saw the First Light USA line of Tomahawks flashlights advertised in early 2010, I had a deep-down feeling that I would one day own one. I have always owned some sort of tube flashlight in my repertoire for EDC or keeping in the drawer for normal use but there was something about this particular light that made me want to experiment with a different shape. Unfortunately, the lack of related product reviews and information made me skip it for the time being and go with a Fenix instead. It wasn’t until my friend attended SHOT Show 2011 that really allowed me to check out the flashlight for myself and purchase one.
When I first saw the First Light USA line of Tomahawks flashlights advertised in early 2010, I had a deep-down feeling that I would one day own one. I have always owned some sort of tube flashlight in my repertoire for EDC or keeping in the drawer for normal use but there was something about this particular light that made me want to experiment with a different shape. Unfortunately, the lack of related product reviews and information made me skip it for the time being and go with a Fenix instead. It wasn’t until my friend attended SHOT Show 2011 that really allowed me to check out the flashlight for myself and purchase one.
Since that day, my Tomahawk and I have been inseparable. I have carried this flashlight with me on a daily basis as part of my everyday carry gear, used it for hunting small game, going on grunion runs and have even used it for patient assessments during my job as an EMT-B. Ironically, I've only used at one time to go handgun shooting at night. I need to fix that!
In the months that I have owned this flashlight, it has been knocked around, dropped against the pavement, exposed to marine conditions and everything in between and has been nothing but the light of Earendil, ever ready to light the way. Mind you, I'm not a "tactical operator” or anything like that and certainly haven’t pushed this flashlight to its maximum limit but like everything else I own it has gotten him knocked around quite a bit.. I'm often said to be a “bull in a China shop” about many things and this usually narrows down what gear sticks with me for the long haul.
Right out of the box, I noticed that construction of this flashlight has a refined feel to it. The anodizing is Mil-spec Type III, the housing is aerospace-grade aluminum, the threads at both ends of the Tomahawk’s 2x CR123A battery tube are very smooth and require little effort to manipulate while the buttons on top are rubbery without being sticky. It is a compact 3.4” H x 2.4” L x 1.5” W and has a finger loop for either middle or index finger insertion, essentially allowing the flashlight to become part of the hand.
The head is well-designed with a central lamp and a ring 12 alternating red/green LEDs around the edge. The max output for the central lamp is 120 lumens but I usually use the lowest lumen setting as that satisfies my every day needs without burning up my batteries (batteries last 2hr on the high setting, 60hrs on the low setting). The light thrown has a solid center with no annoying “dead spot” and a generous peripheral halo. I haven’t done any formal beam distance testing but I do know that spotlighting rabbits at 60 yards and shooting them from 25 yards with a pellet gun or a .22 is a rather easy proposition.
The buttons on the Tomahawk take a few minutes to get used to but quickly become second nature and provide for a wide variety of options to tailor to the situation at hand. The left button is constant on, the right button sets intensity and alternate colors and the center button is for momentary white. Here are the possible button combinations.
-Press left and right buttons together to lock or unlock the light.
-Press the central “Momentary White” for 120 lumens of light (any time, any setting)
-Press Momentary White and the right intensity/color button for a white strobe
-Press the intensity/color button multiple times to cycle through the color LED options or hold for momentary use of a colored light.
-Press the left constant-on button for constant colored light (selected previously by the intensity/color button on the right) and adjust the intensity with the intensity/color button
-Press and hold the constant-on to get a constant white beam and adjust the intensity with the intensity/color button
-Press and hold the constant-on even longer to get a multi-colored strobe.
The odd shape of the Tomahawk light is its only real detractor since without a mount of some sort (belt, MOLLE, etc) it is difficult to carry the flashlight around as carrying such an odd shape in the pocket is a little weird. Luckily, the MOLLE mount I have for it fits perfectly on my Maxpedition Versipack Fatboy S-type but when my bag is on the front seat of the rig or hanging in my room and I need my light, it gets annoying. I will probably get a belt mount for it in a little while.
Given the great ergonomics, build quality, battery life and plethora of features packed into a small package, this flashlight has taken first string in my EDC repertoire and I will be hard pressed to change that. However, its overall versatility is hampered slightly by its shape and those used to the normal tube light will need some time to get used to it.
For more information, check out First Light USA
Until next time
-David De La Torre
Sunday, July 24, 2016
DIY STEN
By Nathan Wolanyk
Of all the semiautomatic firearms that one can build, the STEN has to be the easiest to and requires the least amount of investment in both tools and time to complete
As an example, the author actually built his STEN using a carpenter’s vise bolted to a Pepper Tree stump (trimmed appropriately with a tomahawk), cut all the slots with with a Rotozip and filed everything to fit with a set of rusty files. The only expensive tool required for the process is a MIG welder. 140 Amps is recommended.
All said though, the author’s build was completed with a lot of mentoring and collaboration from his good friend bplvr (true name withheld for privacy reasons), a retired and very talented machinist with a knack for reverse engineering history. It was bplvr that lead the author into the STEN building project and selected Indianapolis Ordinance for the 80% receiver tubes, bolts, spring kits, ejectors and trunnions necessary to complete the project(s) within the scope of existing laws, both federal and state.
For the purpose of illustrating the necessary details of this build, various images from other builds will be shown. The learning process for building these guns has come from a mix of six different STEN projects encompassing multiple MK2, MK3, pistol, German MP3008, and MK2/MK3 hybrid variants. Despite the differences between these STEN variants in overall layout, the basic principles of drilling, dremeling and filing will remain the same.
While it is far quicker and easier to complete the STEN using a milling machine, this tutorial is focused on the budget-conscious builder, or maybe someone that desires to feel somewhat like a backwoods partisan behind Nazi lines. Thus, the only tools required for this build will be a dremel (or other rotary tool), a set of calipers, a set of drill bits (make sure they can cut through 4130 S/S ), thin metal blades for the dremel (.020 thick, not the .060 thick ones), a vise (wood grips inside the vise to prevent marring and crushing the tube preferred), a spring-loaded center punch and files. Try not to break the dremel blades and do not wear the blades down to nothing since as the blades wear down, the smaller diameter remnants will be needed for the smaller slots that need to be cut.
Before starting to cut all the slots, use your automatic center punch to punch six witness marks down the length of the tube at 12:00/3:00/6:00 and the 9:00 positions. You will need these when the paper is off the tube.
Next, you are going to prepare the corners to be drilled and either squared or rounded off. To do so, mark the corner diameter center lines with a center punch, drill a pilot hole and then drill a with successively sized drill bits until the slot ends are made. For instance, use a ⅛” bit to start a hole, then a 3/16”, then a 5/16”, then a ⅜” and so on. The pictures below will illustrate this point.


In these photos you will see bplvr’s notes written on the tube. Notice how in photos 1-3 that the corners have been marked with a center punch to allow the pilot hole to be drilled accurately.
Photos 4-9 show how each slot to be cut has a hole in the corner. Each hole was started with a ⅛” drill bit then increased in size so the corners were taken out in a perfectly rounded fashion.
Before you cut anything ,using your automatic center punch, punch 6 witness marks down the length of the tube at 12:00/3:00/6:00 and the 9:00 positions. You will need these when the paper is off the tube.
Start with the long charging handle slot. Run the entire length .010 deep on one spot and repeat until the whole slot is cut. The goal is to connect the ⅜”diameter drilled hole at each end of the slot and 2 x ⅜” holes for the safety slot to form one continuous slot. At this stage of the game, the slot will not be a perfect ⅜” width, but this is what drill bits and files will be used for at a later stage. The finished slot should be .375 +.010 /-.000. This slot is what determines the angle of the location of the semi-auto bolt to the ejector. (see image 10 and 11 for what the slot looks like before and after)
Next, you will cut the magazine well slot going from front to rear. The same will be done for the ejection slot. After both slots have been cut, change out your cutting blade for a fresh one and save the old one for cutting the smaller J-slots and the like. (See image 10-5 to see the J-hooks that are cut with the used, smaller cutting blades)
Next up is the sear lever slot, as seen in image 5. This will be cut in the same way as all the other slots and sized all the way down the channel with a .125-.140 drill bit.
STEN sear lever slot .125-.140 drill hole. Size with drill bit. Square or round end. Ideal width is .015 wider than the sear lever.
The dimension for the location of the sear from the rear of the tube will most likely be shown as 3.750”. It is best to change this dimension to 3.850” and file later to match your sear location.
Most STENS were made with VERY liberal hole locations, and if you cut the sear slot too short your tube is junk.
Next up are the J-slots to hold in the end cap. Use a big cutter to start the J-slots and finish the corners with a ¼” drill. Use the smaller cutting wheels saved from before to make some of the finer cuts, as there are some tight working spaces in this area. If you don’t have any small cutters, then you will have to take a big cutter and grind it down on a sacrificial piece of metal to get it small enough to get into those small slots and cut them right.
After all the slots have been cut, it is time to file everything (and I mean everything) to fit. For all the channels and slots, you should use the shank (the non-drilling portion) of an appropriately sized drill bit to size the slot from one end to the other. Wherever there is a snag, examine the area and determine which direction one needs to file. Before filing cut some long pieces from a soda bottle and slide them into the tube. This will keep the file from dinging the inside of the tube. All file strokes should be spread out and not concentrated into one part, as this will cause issues with unevenness. The easiest way to tell is to look at the paper glued to the tube and see where the black lines are. The black lines should disappear with the right amount of metal removal, assuming that they don’t catch fire first.
Deburring the inside of the slots is also critical, as the bolt won’t ride in a tube full of obstacles. File down the inside of the tube at an angle to get rid of all those burrs on the inside.
Next article: Trunnions, welding
Good luck and enjoy your build!
Wednesday, July 20, 2016
Gear Review: 5.11 Tactical Stryke pants with Flex-Tac
When I think of tactical pants, I pretty much only think of pants from 5.11 Tactical; they are versatile, durable, and I can go anywhere in them and use them for anything. I am no stranger to the other 5.11 brand products. I used the 5.11 Select Carry pack as my LUCC (Locked Unloaded Concealed Carry)* bag until it was stolen and I regularly wear a pair of the less “tactical” and more streamlined 5.11 pants to go to semi-formal events like church, work or even weddings. All of these clothing items have been nothing but exemplary in quality and they fulfilled their designated roles quite well. But after trying out the new Stryke pants, the same can be said for them!

(Please excuse the wrinkles, I just took them off when this photo was taken)
When I first got my pair of Stryke Flex-Tacs, I was rather impressed with the quality of construction and materials. All the seams are double stitched, there aren’t any rough stitching spots that could annoy one’s skin and the fabric is a low-maintenance rip-stop fabric consisting of 41% Flex-Tac® polyester, 24% polyester and 35% cotton (don’t quite know what Flex-Tac® is myself but it seems to work well!). As many people already know, a poly/cotton blend doesn’t require ironing (if hung straight away from the dryer) and doesn’t require extra work to eliminate tougher stains like oil. Add on the ability for polyester cotton blends to stretch, dry quickly and respire, and you get a pair of pants that can be used for just about anything.


Pocket flap detail

When I tested them out for a few hours just around the house, I noticed several very cool features that aren’t typically seen on run-of-the mill pants, at least in my experience. For one, I noticed that I didn’t have to adjust my nether anatomy quite as much, if at all (one of my greater annoyances). I came to find out that is because instead of a normal crotch where the seam runs the entire middle of the pant, the Stryke pant is “gusseted,” which adds breadth to the fabric and breaks up the seam, making the garment just… well, fit better. You will notice in the photo below what I am talking about. This might not be a completely revolutionary idea but it is something I haven’t come across at all in all my clothes and it makes the fit really, really comfortable.

Another thing that got me stoked about these pants are the pockets. The back pockets are deep and practical and are attached with Velcro, making access quicker than normal buttons and more comfortable than snaps. The leg pockets have Velcro closures as well and have internal pockets or dividers for tidily holding important objects like magazines and cell phones. There are even pockets in the front for magazines. If someone were to get frisky enough to need it, you can literally pack six 30rd magazines in these pants, with two in each leg and two in the front. Of course, at over one pound per loaded magazine, things could get annoying rather quickly. Trust me, I drove 60 miles and went to a shooting range with four fully-loaded 30rd AR-15 magazines in my leg pockets and while I accomplished it in relative comfort, it was interesting slinging around that much weight on the legs for a few hours. I think it is safe to say that these pants aren’t necessarily for long-term transport of magazines; for tactical drills or real-life scenarios, it would be just fine. The side pockets are standard fare but there is a reinforced area for knife clips in the lower corner, which is always appreciated for those that use knives with the “wave” feature like the Spyderco Endura 4 Wave or some of the Emerson blades.


A hidden but welcome feature of these pants is the pair of hidden kneepad insert pockets. Being hidden, you can’t get to them from the outside so you have to turn the pant leg inside-out to gain access these pockets. I didn’t have a chance to utilize this feature during my review but for those that kneel or slide around a lot, I can see this feature as being really convenient and even necessary. What I appreciate most about them though is that there isn’t a zipper or other unseemly fastener to cause irritation in the knee area.


Like my “dressy” 5.11 Tactical pants, the Stryke pants have a sort of elastic harness system that fits the pants to your waist. Seeing as how every once in a while I do go off the caloric deep-end and binge (my garden has been quite prolific so I have been experimenting), the stretch feature is really nice for giving a bit room for weight variation that tends to occur in normal day-to-day life. The only downside to this elastic feature is that sometimes your undergarments can show through the side pockets so keeping your weight to the lighter end of the spectrum and your waist closer to your true size will prove to be more comfortable.
Some other small features of these pants that I appreciated are the bilateral badge holder slots (I used my EMT badge for pictorial purposes), the wide belt loops (up to 1.75” belt!) and the sturdy snap for front closure. The belt used below is my Simply Rugged Real Man's Belt (1.5" wide)

Overall opinion: These pants are well-made, comfortable, and above all, very functional, practical and easy to maintain. I haven’t owned these pants long enough to say anything about their durability but being a 5.11 Tactical product it is backed by an excellent reputation so I cannot imagine anything these pants as being less than durable.
Click here to see some tactical pants
Click here to see more tactical gear.
CARRY ON!
-N8
*For the uninitiated, LUCC is a concept that is, as far as I know, unique to California. It basically allows us peons to carry a firearm with us anywhere a firearm isn’t otherwise prohibited as long as it is unloaded and in a locked case.
Tuesday, July 12, 2016
Esco cops don't like bows either...
A small blog post for the sake of some humor...
So I spent today in Escondido with my older brother while his truck got fixed over on Escondido Blvd. Knowing that it would be a while, I brought along my bow and some arrows so I could walk over to Willow Creek Archery to get some new fletchings and a peep tube. The distance from the auto shop to WCA is about 3.2mi, so 6.4mi round trip.
During the whole time walking (4hrs) we saw about 10-12 cops. On the return trip, I noticed one cop look out his window like he just saw Mila Kunis in a mini skirt. Knowing this would probably initiate a contact not directly related to tea and crumpets, I turned on Cop Recorder 2 on my phone (If you do not have this app, get it. One of the best apps ever.)
Sure enough, about 2min later, the cops rolled up about 30' behind me. Here is how it went:
Officer: Sir, SIR! You with the arrows!
*I turn around*
Officer: Can we talk with you for a second?
Me: Am I under arrest?
Officer: No.
Me: *Salute* See ya!
These two cops followed me for a few blocks, probably radioing frantically to dispatch trying to figure out how to stop someone in possession of even a college campus legal weapon. After we passed them near Peterson's Donut Corner ( or maybe it wasn't... in any case, the reference alone is hilarious!) they turned back north and left us alone.
I have audio of the encounter but they were too far away to be picked up by my phone so it is just me with my two lines.
So yeah, that's my story for the day.
CARRY ON!
-N8
Subscribe to:
Posts (Atom)